

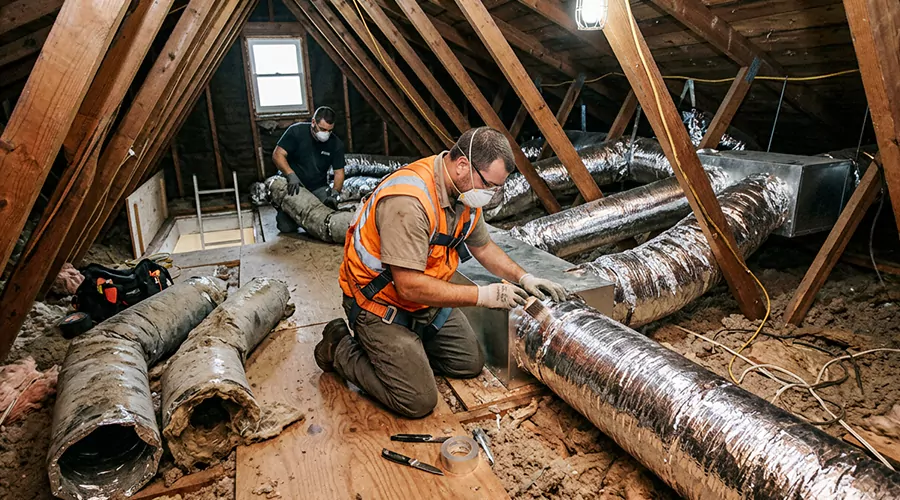
You can fix damaged ductwork insulation by inspecting the affected area, correcting any moisture problem, and restoring the insulation and its protective covering. Small tears in an otherwise dry outer jacket may be repairable with compatible HVAC sealing materials. Missing or saturated insulation generally requires replacement. In 2026, professional duct insulation repairs commonly cost $200 to $800 for limited projects.
Duct insulation reduces unwanted heat transfer as conditioned air moves through the HVAC system. It is particularly important when ducts pass through unconditioned spaces such as attics or crawlspaces. Without suitable insulation, cooled air can gain heat before reaching the room, while heated air can lose warmth during colder weather.
Insulation also helps prevent condensation on cold duct surfaces when the protective covering is properly installed. Damage to the insulation or vapor-retarding layer can allow moisture to collect around duct connections. Identifying which layer is affected helps determine whether the existing insulation can be restored or needs replacement.
What Causes Ductwork Insulation to Become Damaged?
Ductwork insulation becomes damaged through physical contact or deterioration of its protective covering. Moisture can also reduce the condition of the material and create problems that cannot be solved by simply applying tape. The cause should be identified before repair because repeated exposure can damage new insulation as well.
Physical Damage During Maintenance
Duct insulation is vulnerable when it runs through attics or other spaces used for equipment maintenance. Tools and stored materials may tear the outer covering or compress the insulation. Workers moving around ductwork can also disturb insulation near joints or fittings.
Small tears may expose the insulation beneath the protective jacket. If the air-carrying duct remains intact, the immediate problem may involve insulation rather than an air leak. However, the exposed material should be examined because a damaged outer layer can allow moisture to enter in humid conditions.
Failed Seams and Sealing Tape
Insulation coverings commonly rely on sealed seams to create a continuous protective layer. Over time, unsuitable tape or poorly attached seams may separate from the surface. The resulting gaps can expose insulation to humid air and allow the material to deteriorate.
A loose outer seam is different from a disconnected duct connection. The duct may remain airtight while the insulation covering is no longer properly sealed. Repairing the protective layer can be appropriate when the insulation beneath it remains dry and undamaged.
Condensation Around Cold Ducts
Condensation develops when humid air contacts a surface colder than its dew point. During air conditioning operation, poorly insulated supply ducts may become cold enough for water droplets to form. Damaged vapor-retarding coverings can allow this moisture to reach the duct surface beneath the insulation.
Repeated condensation may saturate insulation and affect nearby building materials. The problem can continue even after the visible water has dried because moisture may remain trapped inside the insulation. Correcting the insulation system and surrounding humidity conditions helps prevent recurring damage.
Roof or Plumbing Leaks
Building leaks can damage insulation without any problem originating inside the HVAC equipment. Water entering an attic or ceiling cavity may soak the outside of a duct or collect around a joint. Fiberglass insulation can retain moisture when exposure continues.
Covering water-damaged insulation with new tape is not an effective repair. The source of water must be stopped and the affected material evaluated. Wet or moldy insulation should generally be replaced rather than enclosed beneath another covering.
Poor Installation and Compression
Duct insulation must maintain the thickness required for its rated thermal resistance. When a covering is pulled too tightly or a narrow strap compresses the material, its insulating performance can decrease. Compressed sections may also create cold spots where condensation becomes more likely.
Flexible ducts are particularly sensitive to compression because their insulation surrounds a lightweight inner liner. An improperly installed hanger can deform both the insulation and the air passage. Correcting the support arrangement is therefore part of preventing additional damage.
Aging Materials and Pest Activity
Older insulation coverings may deteriorate after years of exposure to changing temperatures or physical movement. The outer jacket can develop cracks or openings that leave the insulation exposed. Certain pests may also damage flexible duct coverings while moving through concealed spaces.
Pest-related damage requires additional caution because surrounding material may be contaminated. Avoid handling suspected droppings or nesting debris with ordinary household cleaning equipment. The source of pest entry should be identified before replacing affected insulation.
How Can You Tell if Duct Insulation Needs Repair?
Damaged duct insulation may be visible as torn exterior coverings or exposed fiberglass. Other symptoms include repeated condensation and unusually warm or cold duct surfaces. However, comfort problems alone cannot identify damaged insulation because duct leaks and HVAC equipment issues can produce similar results.
The most useful inspection considers the insulation's condition and whether moisture is present. A small tear over dry material may be repairable, while water-soaked insulation needs more extensive attention. The condition of the underlying duct should also be checked before the covering is restored.
| Warning Sign | Possible Problem | Recommended Action |
|---|---|---|
| Small tear in foil-faced covering | Damaged protective jacket | Inspect and repair if insulation is dry |
| Exposed fiberglass | Missing or separated outer layer | Restore suitable insulation protection |
| Wet insulation | Condensation or water leak | Correct moisture and assess replacement |
| Compressed insulation | Poor support or tight wrapping | Restore proper thickness and support |
| Loose insulation around fitting | Failed connection covering | Repair the insulation assembly |
| Rust beneath insulation | Persistent moisture exposure | Assess metal and insulation condition |
| Crushed flexible duct | Structural and insulation damage | Evaluate section replacement |
| Musty odor with damp material | Possible moisture contamination | Investigate before disturbing material |
The table helps distinguish minor jacket damage from problems affecting the insulation itself. A visually damaged covering does not always require replacing the full duct run. However, wet or severely deteriorated material should not be treated as an ordinary taping repair.
What Is the Difference Between Duct Insulation and a Vapor Barrier?
Duct insulation and its vapor-retarding covering perform different functions. The insulation limits heat transfer between conditioned air and the surrounding environment. The outer covering helps reduce the movement of water vapor toward cold surfaces where condensation could occur.
Fiberglass duct wrap often contains a foil-faced exterior layer. This protective facing must remain properly sealed at seams and around fittings. If the covering is damaged, humid air may enter the insulation even when the fiberglass still appears to be in place.
The difference matters when choosing a repair. A torn jacket over dry insulation may require restoration of the protective covering, while missing fiberglass requires replacement of the insulating material. If the underlying duct is leaking air, that connection must also be sealed before insulation is restored.
| Component | Main Function | Consequence of Damage |
|---|---|---|
| Fiberglass insulation | Reduces heat transfer | Greater heat gain or loss |
| Foil-faced outer covering | Helps control moisture entry | Increased condensation risk |
| Insulation seam tape | Keeps the covering continuous | Gaps that expose insulation |
| Duct air seal | Prevents air escaping through joints | Loss of conditioned airflow |
| Support straps | Hold duct and insulation in place | Sagging or compression |
| Internal duct liner | Carries conditioned air in flexible ducts | Air leakage if torn |
Sealing an exterior jacket does not automatically repair an opening in the air-carrying duct. Likewise, closing a metal duct seam does not restore missing insulation. A complete repair must address whichever components have actually been damaged.
How to Fix Damaged Insulation on Rigid Metal Ductwork?
Damaged insulation on rigid metal ducts can often be repaired when the underlying duct remains sound. The process starts with identifying the affected insulation and making sure the metal surface is dry. If only the outer covering has torn, a limited repair may be possible. Extensive water damage generally requires replacing the affected wrap.
Step 1. Turn Off the HVAC System
Switch off the heating or cooling system before inspecting damaged insulation closely. This makes it easier to examine the duct without normal airflow affecting the area. Avoid opening electrical equipment or removing panels that are unrelated to the insulation.
Check whether the duct is safely accessible. Attics may have extreme temperatures and areas without finished flooring. Do not step between ceiling joists or work from an unstable position.
Step 2. Identify the Damaged Layers
Inspect the visible covering and determine whether the insulation beneath it is dry and intact. A narrow tear in the foil-facing may be different from insulation that is missing or compressed. Look for water staining that suggests moisture has traveled beneath the protective layer.
Avoid pulling sound insulation away from the duct unnecessarily. Disturbing the material can create additional gaps and damage the surrounding covering. Document the affected area before deciding which materials need replacement.
Step 3. Check the Underlying Metal and Seams
The duct should be structurally sound and airtight before insulation is restored. If a metal joint is leaking, seal it using suitable HVAC materials after confirming that the connection is mechanically secure. Inspect the metal for corrosion or standing moisture that could indicate a larger problem.
Do not apply insulation over a wet duct surface. Trapping moisture against metal can contribute to corrosion and recurring condensation. Correct the source of water before continuing.
Step 4. Replace Damaged Insulation When Necessary
If fiberglass insulation is missing or no longer suitable for reuse, replace the affected portion with compatible duct wrap. The new material should provide the thermal resistance required for the installation. Match the existing system where appropriate while meeting current applicable requirements.
The insulation should fit securely around the duct without excessive compression. Gaps at corners or fittings can leave cold surfaces exposed. Proper contact and continuity help reduce unwanted heat transfer.
Step 5. Restore the Vapor-Retarding Covering
Use compatible facing materials and approved sealing tape to create a continuous exterior covering. Follow the insulation manufacturer's instructions for overlap and seam treatment. The covering should protect the fiberglass without squeezing it tightly against the duct.
Pay particular attention to elbows and connections because these areas can be difficult to wrap evenly. An unsealed gap around a fitting can allow humid air to reach cold surfaces. The completed covering should remain securely attached and free from openings.
Step 6. Inspect the Finished Repair
After restoring the insulation, check that the covering remains continuous and the duct supports are secure. The material should not hang loosely or interfere with other equipment. Any removed supports must be restored without compressing the insulation excessively.
When normal cooling resumes, monitor the repaired area for condensation. Moisture problems may become apparent only after longer cooling cycles or during humid weather. Repeated dampness suggests that another air-sealing or moisture-control problem remains.
How Do You Repair Insulation on Flexible Ductwork?
Flexible duct insulation repairs require attention to the inner liner and exterior covering because these components form a layered assembly. A tear in the outer jacket may be repairable when the fiberglass remains dry and the inner duct is intact. Our air duct replacement service becomes more appropriate when extensive damage affects the inner liner.
Begin by identifying which layer has failed. The inner liner carries air, while the fiberglass insulation limits heat transfer. The exterior jacket helps protect the assembly from moisture and physical damage.
If only a small area of the protective jacket has separated, compatible tape or a manufacturer-approved repair may restore the covering. The repair must remain continuous without compressing the insulation. A damaged air-carrying liner requires a separate airtight repair rather than simply sealing the jacket.
When insulation is missing along a substantial part of an older flexible duct, replacing the duct with properly insulated material may be more practical than rewrapping it. The replacement must use the correct diameter and be supported without excessive sagging. This approach also allows damaged liner connections to be corrected.
Can You Repair Wet Ductwork Insulation?
Wet duct insulation requires investigation before any repair covering is installed. The first step is determining whether water came from condensation or an external leak. If the insulation remains damp, sealing it beneath a new vapor barrier may trap moisture and worsen the problem.
Fiberglass insulation affected by substantial water exposure can become difficult to dry completely, particularly when moisture remains beneath the protective facing. Wet or moldy duct insulation should generally be removed and replaced by a qualified contractor. The affected metal or liner should also be examined for damage.
A small amount of moisture on an exposed metal surface is different from saturated insulation. The metal may be restorable after drying and appropriate treatment, while porous material may need replacement. Identifying the affected layer prevents an incomplete repair.
Any roof or plumbing leak must be corrected before new insulation is installed. If condensation caused the damage, the repair should address the insulation's thermal performance and vapor protection. Replacing materials without resolving the water problem may lead to another failure.
What Insulation R-Value Should HVAC Ductwork Have?
Duct insulation R-value measures resistance to heat flow. A higher R-value provides greater thermal resistance when other conditions are comparable. The appropriate requirement depends on the duct location and the applicable energy code.
R-6 and R-8 are common insulation ratings used in residential duct systems. ENERGY STAR recommends R-6 or higher for many ducts in unconditioned areas, while some energy-code applications require R-8 for certain supply ducts. Local requirements should be checked before selecting replacement insulation.
The printed R-value applies to insulation installed according to its design. Compression and gaps can reduce actual performance. A properly installed covering with continuous insulation is more effective than a higher-rated product that has large exposed sections.
For repairs, consider both the insulation rating and the condition of the vapor-retarding layer. An otherwise suitable insulation material may still develop condensation problems if humid air can enter through damaged seams.
How Much Does Ductwork Insulation Repair Cost in 2026?
Limited duct insulation repairs commonly cost $200 to $800 in the United States during 2026. Insulated flexible duct repairs may range from $200 to $1,200 when damaged liners or connections are also involved. Larger duct insulation projects can cost $1,000 to $2,700 or more depending on the amount of material being installed.
| Insulation Repair or Service | Estimated 2026 U.S. Cost |
|---|---|
| Localized duct insulation repair | $200 to $800 |
| Repairing insulated flexible ductwork | $200 to $1,200 |
| Crawlspace insulation replacement or addition | $300 to $1,700 |
| Larger duct insulation project | $1,000 to $2,700 |
| Replacing a damaged duct section | $400 to $1,500 |
These figures describe different project sizes and should not automatically be added together. A localized jacket repair is not equivalent to replacing insulation throughout an attic duct system. The amount of material and accessibility determine the scope.
Moisture damage may add costs when the underlying duct requires repair. For example, water-damaged insulation surrounding a corroded metal section may require both insulation replacement and duct repair. Estimates should identify those tasks separately.
What Mistakes Should You Avoid When Repairing Duct Insulation?
Improper insulation repairs can trap water or leave cold surfaces exposed. Applying additional covering without checking the material beneath it is a common mistake. Repairs should restore thermal performance and moisture protection rather than simply hide visible damage.
Avoid these mistakes:
- Wrapping new insulation over saturated material.
- Leaving exposed metal around duct fittings.
- Using ordinary cloth-backed duct tape on exterior seams.
- Compressing fiberglass insulation with narrow straps.
- Ignoring air leaks beneath the insulation.
- Installing insulation with an unsuitable R-value.
- Leaving the vapor-retarding covering unsealed.
- Repairing only the outer jacket when the inner liner is torn.
- Disturbing unfamiliar old insulation without proper identification.
- Reusing material with visible significant mold contamination.
Older insulation deserves special caution because some materials installed decades ago may contain asbestos. Do not cut or remove suspicious insulation until its composition has been evaluated. Damaging potentially hazardous material can create exposure concerns that are unrelated to ordinary duct repair.
When Should You Call an HVAC Professional?
Professional repair is appropriate when insulation is extensively damaged or remains wet after a leak. Contaminated fiberglass and concealed duct insulation also require evaluation. A qualified HVAC technician can determine whether the material can be restored or whether the affected duct section needs replacement.
The technician should inspect the underlying air passage before applying new insulation. Duct leakage may contribute to unwanted temperature and moisture conditions. Repairing those connections first helps prevent the new insulation from concealing unresolved defects.
Professional assessment is also important when existing insulation may contain asbestos or when a repair requires entry into an unsafe attic. The work should preserve the duct's airflow capacity and comply with applicable insulation requirements.
How Can You Prevent Duct Insulation From Getting Damaged Again?
Preventing insulation damage requires protecting ductwork from physical contact and controlling moisture around cold surfaces. Proper support keeps flexible ducts from compressing their insulation, while intact coverings reduce humid air reaching the material. Regular observation can identify minor defects before significant water damage develops.
Protect Exposed Insulation
Avoid placing stored items on ductwork or dragging tools across insulated sections during maintenance. Even small tears in the covering can expose fiberglass and allow moisture to enter. Check nearby duct branches after renovation work and correct visible damage promptly.
Maintain Proper Supports
Use suitable straps or saddles to support flexible ducts without compressing their insulation. Narrow supports can create pressure points that damage the protective jacket. Maintaining the intended shape also helps reduce airflow restrictions.
Monitor Condensation
Inspect accessible cooling ducts during humid weather for water droplets or damp coverings. Condensation should not repeatedly form beneath sound insulation. If moisture returns, investigate air leakage and vapor-barrier defects before adding more material.
Address Water Leaks Promptly
Repair plumbing and roof leaks that affect ductwork, and evaluate insulation exposed to water. Dry surfaces should be confirmed before replacement coverings are installed. Prompt moisture correction can limit damage to surrounding materials.
Conclusion
Fixing damaged ductwork insulation involves identifying the affected layers and correcting any moisture problem. Small tears in dry protective coverings may be repairable, while missing or saturated insulation often requires replacement. Proper installation must preserve the required R-value and vapor protection. Extensive damage may need professional evaluation. This week, inspect accessible duct insulation for tears, dampness, and compressed sections.